FREE CRAFT PATTERNS
!Birdhouse Welcome Sign
This charming, easy to make welcome sign is at it's most rustic when made of old barn wood. However, new wood can be used and "weathered" according to the instructions below.

Supplies
1 in. x 4 in. x 18 in. boardInstructions
Cut one end of the board to form the peak of the birdhouse roof. Old barn wood or a slat from an old stockade fence looks the most rustic. (See below if you need to "weather" new wood.) Approx. 4 in. below the peak, drill a centered hole all the way through. Sand wood lightly and paint inside of hole black to help it show up. If you don't have a drill, you can paint a "fake" hole. I did mine that way as a pattern for you. First, draw a circle by tracing around one end of a large spool of thread or similar object. Fill in the circle with black paint. A thin "crescent" of white along the right side will give the hole visual depth. (See illustration.) Attach saw tooth hanger to back of board near the top. Below the hole, hot glue the dowel in place as a perch. Below the perch, draw the letters W-E-L-C-O-M-E, one below the other, spacing the letters evenly and leaving about ½ inch between the bottom of one and the top of the one below it. Letters should be approximately 1" tall. Leave at least 2 1/2" of board below the last letter. Paint the letters black, then outline them with a thin line of any color you would like. (I used dark rose.) A thin "comma" of white along the upper left hand corners of each letter will highlight them. If you're going to hang your birdhouse outside, spray or brush it with an outdoor matte finish. Cut your cedar sprigs into different lengths and seperate into 2 similiar stacks. Cut two pieces at least 2" longer than the length from top to bottom on one side of the roof. Cut several other pieces about half this length, then several other very short ones (about 1" in length). Hot glue one of the long cedar sprigs to one side of the roof, with the cut stem at the peak and the foliage hanging over at the bottom, as in the picture. Using medium length pieces, glue them one at a time over the stem of the first one, overlapping each piece enough to give a look of fullness. Keep all stems running up the peak toward the top. Finish with small sprigs near the peak. These will be actually be standing almost straight up. Be sure to cover any stems that show or any gaps. A few final, short pieces of cedar, glued upright at the peak, will finish it. Glue in a few berries and a few small pieces of statice here and there for added color. Right at the bottom of the "hole," glue a small tangle of moss. Arrange a small group of silk flowers to the left of the perch. Glue another small group to the bottom right of the board. Insert small pieces of cedar, statice, and berries in and around the flowers. Glue the raffia bow beneath the bottom group of flowers. Hang and enjoy!
To "weather" new wood: mix 2 parts brown paint, 1 part black paint, and 3 parts water. Apply as a stain using a wide brush. Work quickly. Don't worry about uneven coverage or irregularities --- these will only add to the charm. Be sure to do all the edges and the inside of the hole if you drilled it out. Not dark enough to suit you? Reapply the same mixture.
Variations:
Don't like the rustic wood look? Paint your birdhouse your favorite color (rose and red look great with the green cedar roof!) and use white or cream flowers. Leave the lettering plain black. Another interesting variation: Do you or a friend have a woodpile? Chip off chunks of bark and "shingle" the roof with them instead of covering it with cedar. Use cedar or dried ferns for decoration. A great look, too!
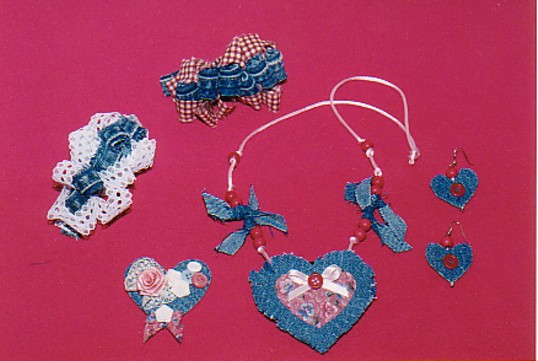
Denim Fashion Accessories
Supplies
|
For Hair Bow 3" long plain metal hair barrette 4 or 5 belt loops from an old pair of jeans ½" wide flat lace, any color, about 2 yards. long needle threaded with white thread OR: same size torn strip of cotton print fabric hot glue gun |
For Necklace/Earrings one pair dangle earring findings small scraps of old denim length of satin cording, 12" longer than you want the necklace 12 wooden pony beads small satin ribbon bow small scrap cotton print fabric 2 "eye pins" |
Instructions for Hair Bow
Cut the lace into 2 equal lengths. Using the needle and thread, gather the end of one piece. Cut thread. Gather lace every 3 inches, cutting thread after each. Set aside while you do the other piece of lace the same way. When you are finished, you will have two lengths that look like this:

Fold each strip in half to find the center (or the gather closest to the center). Mark the spot with a pin and lay each strip out parallel to the barrette, one on either side of it. Find the center of the barrette and apply a thin line of hot glue across it. Press the center gather of each strip side by side into the glue. Move about ¼" away and apply another line of glue. Press the next gather on each strip of lace into it. Continue until you reach the end, adjusting spacing as needed for a full look. Start again in the center and work toward the other end. Cut off any excess lace. Hot glue each belt loop into a circle. Glue each of these down the center of the lace loops, varying the angle slightly, and your barrette is done!
Variations:
For variety, try using torn fabric strips instead of the lace. Don't have an old pair of jeans from which to get the belt loops? Use denim-colored ribbon, or any color of ribbon that suits you! Use your imagination!
Necklace and Earring Set
From scrap denim, cut two matching hearts approximately 3" across. From print fabric, cut a smaller heart (approx. 2" across). Using white craft glue, glue the print heart into the center of one of the denim hearts. Place the 2nd denim heart behind the 1st, but don't glue it yet. Using sharp scissors, fringe the two denim hearts right to the edge of the print one. Caution: don't try to make the fringe too narrow --- some of it is likely to tear off and ruin the symmetry. Lay aside the loose denim heart and place the denim and print one face down on your work surface. Find the center of the satin cord and hot glue it to the BACK of the denim and print heart, positioning it so that it curves upward toward the "shoulders" of the heart. Do not glue it to the fringed section. Glue the 2nd denim heart in place, wrong sides together, so that it covers the cord. Do not glue the fringe. Turn the necklace over and glue the satin ribbon bow (and a small button or bead, if you like) onto the print fabric heart. Knot the satin cord on each side of the denim hearts, approximately ½" away from the fringe. Slide 2 pony beads onto each cord. Knot close to the beads to keep them in place. Cut scrap denim into 4 strips about ½" wide by 5" long. Tie 2 of these around each cord, just above the last knot you tied. Cut the ends off at angles. Slide 2 more pony beads onto each cord. Knot above them. Measure 1" and knot again. Slide a final pony bead onto each cord and knot close above it to hold it in place. Drape the necklace around your neck to determine the finished length. Knot the two ends together. Add a drop of glue to ensure that the knot doesn't unravel.
Earrings
Cut 4 matching hearts out of denim, approx. 1" across. Glue two together, wrong sides together. This is one earring. Glue the remaining two together the same way. Use a heavy needle or safety pin to punch a hole in the top of each doubled heart, right where the two "shoulders" meet. Put a pony bead on each of the eye pins, then push one eye pin through the hole in each of the doubled hearts and loop the eye pin back on itself, forming a loop like the one above the bead. Hang the top of the eye pin from the pierced earrings. Decorate earrings with buttons, bows, etc.
Denim Heart Pin
All this requires is a doubled denim heart (just like you made for the earrings, only larger), some bits of left over lace, a small ribbon or torn fabric bow, 1 or 2 small, thin wooden stars, painted whatever color you like (mine are white in the photo), two or three buttons, one or more small silk or ribbon flowers, and a pin back. Try different arrangements: anything goes! When you're satisfied, glue everything in place, and it's done!